 To get started, we measured up our front yard, and then went to Total Eden with a scale drawing. We didn't realise we had to provide them with our bore flow rate too, so we had to go back for that missing detail. After figuring out how to turn our bore on, we realised that measuring would be difficult since the water pretty much exploded out of the bore pipe! To actually measure the water, we used a big mop bucket with measurements on the inside and let the bore run for 1 second (I timed 1 second with Matt's iPhone). Well, we didn't PLAN it to be 1 second, but it just so happened that the time it took for Matt to turn the bore on, and then turn it off again as soon as he heard me scream "ARHGHRHSTTTTOPPP" was 1 second. We measured 4 litres in the bucket, and 0.9 seconds on the iPhone, and lets estimate about 10 litres all over me, which was enough to tell the man at Total Eden that we had plenty of bore pressure to run the whole front on one solenoid (he almost didn't believe us).
Total Eden drew up a plan for us and quoted $680 for all the parts, so we were really happy to save the extra even if it meant doing the hard bit ourselves.
 Actually doing the retic involved measuring where the pipes were to be laid, digging trenches for the pipes, and putting the pipes together. Before we started, we decided to get rid of our old and unused cement bore by smashing it up with a sledge hammer and filling it in with sand. It was much more successful (and fun!) than we expected and it's completely gone now so we have one less eye sore to worry about!
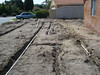
 Matt, my dad and I spent all day Saturday measuring and digging the trenches. It was... extremely difficult, and the 36 degree heat did not help. We found that taking turns digging while one person went around wetting the dirt with the hose was the most efficient way to work.
We spent all day Sunday actually laying the pipes. This involved measuring the pipes up, priming the ends (with pipe primer) and gluing pipes together with T-junctions between them (using PVC cement). The T-junctions had the bottom of the 'T' facing up and were for the actual sprinklers to sit in. Another key aspect of the day was continuously driving to Bunnings to get extra parts as we kept breaking stuff.
 After all the pipes were glued together, we turned the bore on (with the sprinkler tops taken out) to make sure the water ran correctly, but we were a bit worried that the pressure wasn't high enough since sprinklers at the end of the rails weren't really turning on. We ran it for a bit to get all the sand out of the pipes and then screwed all the sprinkler tops on for the final test. It worked great! Turns out you get heaps more pressure when the sprinkler tops are on so there was no drama there. The last step for Sunday afternoon was to cover up all the trenches, which was much easier than digging them, but hard work none the less.
 So, we now have retic at the front! For anyone planing to take the "do it yourself" option, I highly recommend waiting for a long weekend (or taking the Monday off) to recover from the task! Next we're planning to get roll-on lawn as soon as we can, and get some paving done to run along the garage and to the back fence. Easter's coming up so hopefully we can get our act together and make good use of the days off from work. Although tomato sauce day is coming up too so that may put a hitch in our plans!

No comments:
Post a Comment