Monday, November 29, 2010
Sunday, November 28, 2010
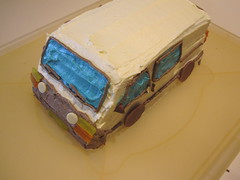
Toyota Hiace Cake
This weekend I made a Hiace cake (with Matt's help) for Cam and Jean's going away dinner. They're still in Perth for another couple of weeks, and then they're off on a trek around Australia in their decked out Hiace van.
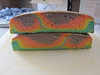
For the cake part, I made a rainbow cake using a square cake tin. I cut the square cake in half and stacked the halves to make the general rectangular prism shape of the van.
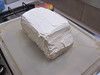
Next I cut off a section from the top of the cake to make the slanty part of the front windscreen. To do this I used an un-serrated knife and cut very slowly at a 45 degree angle aiming to finish at the join between the two halves.

The body paint of the van is (very thick) butter icing. I find that adding a small amount of milk (about a tablespoon for 50gm of butter and 3 cups of icing sugar) to the mixture makes the colour a lot whiter which was appropriate since the Hiace is white. The icing is a lot thicker than usual so that it got into all the cracks and hid the two layers of cake. I used a large spatula to try and get the surface as smooth as possible, but still ended up with quite a lot of icing streaks.
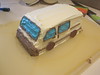
The windows were done using the same butter icing made blue with a few drops of food colouring. I also added some strawberry essence just to make it different to the white icing taste. Applying the blue over the white icing is quite fiddly. I found that the most effective way was to put a dollop of icing (about half a teaspoon) in the center of where you want the window to be, and then spread it out radially with a knife. You need to push gently so that you don't go through to the white, but if you do it's no big deal, you can just hide it with more blue icing. After the shape is correct, run the knife horizontally very gently along the blue icing so that the streaks go all in one direction.

For the bumper and all the other details I used chocolate butter icing (same as the regular butter icing but with two tablespoons of cocoa powder). I made quite a large batch (30gm of butter and 1 cup of icing sugar) because the details require a piping bag which always takes up a lot of icing. Adding the bumpers is not as hard as adding the windows, but the technique is similar. The hardest bit is getting the icing all the way to the bottom of the cake because you need to use the tip of the knife to push it down. I also added large chocolate buttons for the wheels.

I used the smallest circular nozzle on my piping bag to add rims around the windows, the stripe around the van, and the handles and window wipers. My advice is to spend some money on a good piping bag since I bought a cheapo one that broke half way through (grrrr). This part is quite easy if you have a small nozzle, and it's one of those things that turns out better the less you try! When I was concentrating really hard I went too slowly and the lines turned out wonky. The lines looked smoother when there was a thick stream of fast icing.
For the lights and number plates I used sections of yellow, orange, and red jelly snakes cut to size with scissors. If you press the parts of the snake that have been cut they stick together so the lights are nice and sturdy. I think they give a nice effect because they look sort of see-through :) I really like how the back lights turned out.
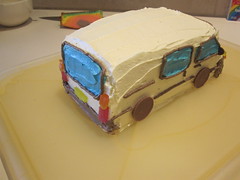
For the front head lights I used white chocolate chips. At first I tried using a section of yellow jelly snake but it just didn't look right. Hiace lights aren't actually round, but this was the best I could get it to look. For the side mirrors I used milk chocolate chips with the flat bit pointing toward the "driver".
And there you have it! A Toyota Hiace Camper Van.
Bon voyage Cam and Jean :)
For the cake part, I made a rainbow cake using a square cake tin. I cut the square cake in half and stacked the halves to make the general rectangular prism shape of the van.
Next I cut off a section from the top of the cake to make the slanty part of the front windscreen. To do this I used an un-serrated knife and cut very slowly at a 45 degree angle aiming to finish at the join between the two halves.
The body paint of the van is (very thick) butter icing. I find that adding a small amount of milk (about a tablespoon for 50gm of butter and 3 cups of icing sugar) to the mixture makes the colour a lot whiter which was appropriate since the Hiace is white. The icing is a lot thicker than usual so that it got into all the cracks and hid the two layers of cake. I used a large spatula to try and get the surface as smooth as possible, but still ended up with quite a lot of icing streaks.
The windows were done using the same butter icing made blue with a few drops of food colouring. I also added some strawberry essence just to make it different to the white icing taste. Applying the blue over the white icing is quite fiddly. I found that the most effective way was to put a dollop of icing (about half a teaspoon) in the center of where you want the window to be, and then spread it out radially with a knife. You need to push gently so that you don't go through to the white, but if you do it's no big deal, you can just hide it with more blue icing. After the shape is correct, run the knife horizontally very gently along the blue icing so that the streaks go all in one direction.
For the bumper and all the other details I used chocolate butter icing (same as the regular butter icing but with two tablespoons of cocoa powder). I made quite a large batch (30gm of butter and 1 cup of icing sugar) because the details require a piping bag which always takes up a lot of icing. Adding the bumpers is not as hard as adding the windows, but the technique is similar. The hardest bit is getting the icing all the way to the bottom of the cake because you need to use the tip of the knife to push it down. I also added large chocolate buttons for the wheels.
I used the smallest circular nozzle on my piping bag to add rims around the windows, the stripe around the van, and the handles and window wipers. My advice is to spend some money on a good piping bag since I bought a cheapo one that broke half way through (grrrr). This part is quite easy if you have a small nozzle, and it's one of those things that turns out better the less you try! When I was concentrating really hard I went too slowly and the lines turned out wonky. The lines looked smoother when there was a thick stream of fast icing.
For the lights and number plates I used sections of yellow, orange, and red jelly snakes cut to size with scissors. If you press the parts of the snake that have been cut they stick together so the lights are nice and sturdy. I think they give a nice effect because they look sort of see-through :) I really like how the back lights turned out.
For the front head lights I used white chocolate chips. At first I tried using a section of yellow jelly snake but it just didn't look right. Hiace lights aren't actually round, but this was the best I could get it to look. For the side mirrors I used milk chocolate chips with the flat bit pointing toward the "driver".
And there you have it! A Toyota Hiace Camper Van.
Bon voyage Cam and Jean :)
Subscribe to:
Posts (Atom)